Christmas crafts

DIY Tall Candle Holder

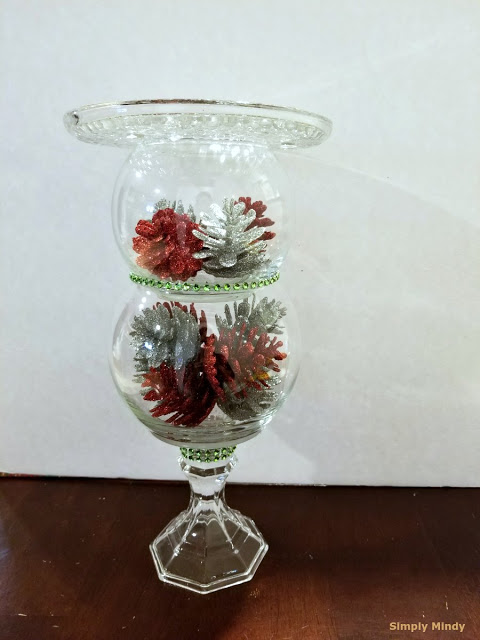
I'm sad to say today is the last day of #12daysofchristmascrafts. The last craft I have to share with you this Christmas is this diy tall candle holder. I have candles all over the house! I thought it would be nice to have a standout piece to display candles on. And, because I only used hot glue to put this together, I can take it apart and customize the vase filler for other seasons/holidays.


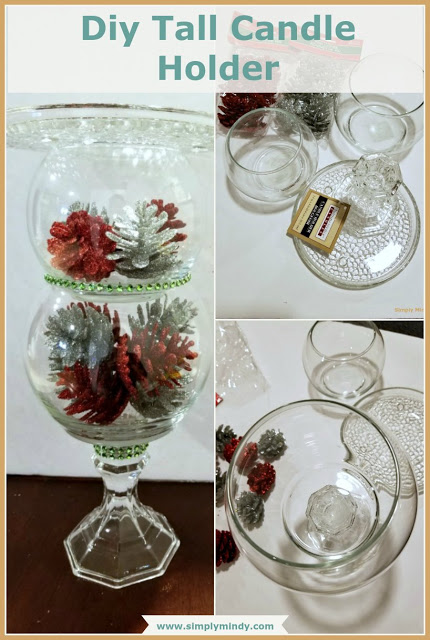
Supplies: All except for glue gun are from Dollar Tree

  • 2 different sized rounded vases 
  • 1 candlestick holder
  • 1 candle plate
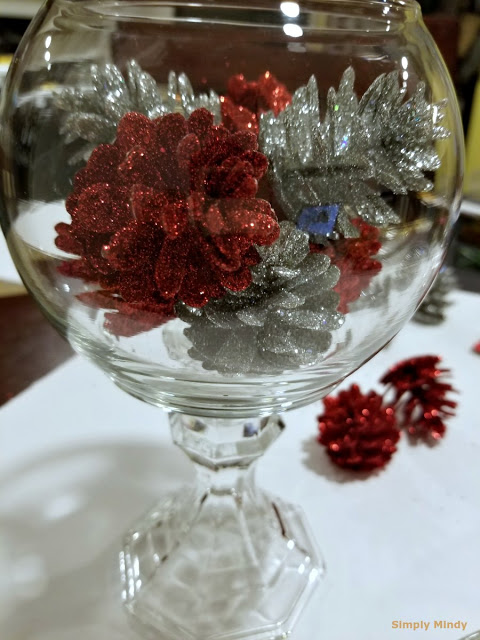
  • 2 packs of mini glittered pinecones
  • glue gun

Step 1: Glue the candlestick to the bottom of the larger round vase. And fill vase with pinecones.


- I used 6 pinecones in the large vase and 4 in the smaller one.

Step 2: Glue the bottom of the smaller vase to the top of the large vase. Fill vase with pine cones left.


Step 3: Glue the candle plate to the top of the small vase. 


- To cover the excess glue around the vase (where the two are glued together) I added some green diamond wrap.


Thank you for checking out my #12daysofchristmascrafts series! It was a lot of fun! If your on Instagram don't forget to tag me @simplymindy3 if you are making Christmas crafts!

Mini Word Signs

On day 11 of #12daysofchristmascrafts I'm sharing these cute mini word signs, made using ornaments from Dollar Tree! When I saw these ornaments I knew immediately that I wasn't going to be using them for the purpose they were made. And this project turned out exactly how I imagined!


Supplies:

  • Word ornaments (Dollar Tree)
  • Wood (I repurposed mine from a raised garden bed) or rectangular wood blocks
  • Paint
  • Wood glue
  • Sandpaper
  • Saw

Step 1: Measure each word ornament and add 1/4 inch on each side of the word. This will be the measurement for the wood block.


* Be sure to measure each word because they are different lengths.*

Step 2: Cut the wood to size. This wood was left over from a raised garden bed I took apart to use for one of my summer décor projects.


Step 3: Sand any rough edges until smooth.


Step 4: Paint each wood block. I used a dry brush technique to give it the same weathered appearance as the ornaments. 


Step 5: Apply wood glue to the bottom of the ornament and attach to wood block. Allow to dry for 24 hours.


- The wood glue directions state to clamp the pieces. But, I found that holding the word in place for a couple of minutes was enough to hold it upright so the glue could set.

When the glue was fully set, I added these raised snowflake stickers using hot glue. This covers the holes where I removed the twine used to hang the ornament.

And here they are on my floating shelves I recently got from Ikea.


After all these projects I'm seriously considering redecorating the main living space in red! Lol. Just kidding, I love yellow way too much😍. 

Decorative gift box tower

It's day 10 of #12daysofchristmascrafts! I have another craft inspired by yet another of my favorite You tubers. Her channel is Giftbasketappeal. Check out tutorials on gift baskets, paper crafts, modpodge crafts, wreaths, and much more! She is amazing. And if you want to learn how to make a bow with ribbon, she has the simplest tutorials ever!. 

Lets' get to the project! 


Supplies:

  • 3 square gift boxes of varying sizes (less than $1 each on clearance)
  • coordinating ribbon (I used 3 colors)
  • floral picks/ embellishments
  • hot glue
  • double sided tape

Step 1: Apply double sided tape to the bottom of each smaller box, and place on top of the next size box creating a tower. 


- This is so the boxes won't move when attaching the ribbon around them.

Step 2: Measure ribbon to fit around the box tower vertically, leaving some slack. Then attach ribbon to the top of each box using hot glue. Do this to each side of the tower.


- This gives a cleaner look than just having the ribbon loose around the boxes.

Step 3: Using ribbon, create a bow( I made 2) and attach to the top of the box tower. 


*The steps after this are optional, but I like the effect of the fullness with more embellishments.

Step 4: Glue a faux flower on top of the bow.


Step 5: Attach berry picks(using hot glue) on each side of the bow, facing the bows center.


Step 6: Attach greenery picks on either side of the berry pick. 


And there it is! This will be sitting on one of the side tables in my living room. It's the perfect added touch!

I hope you're finding some inspiration to do some Christmas crafting of your own! If you have, tag me on Instagram @simplymindy3 and use #12daysofchristmascrafts! Can't wait to see what you come up with!

No-sew Christmas Pillow covers

For day 9 of #12daysofchristmascrafts I'm sharing these no- sew pillow covers. I would love to learn how to use a sewing machine. But, since I don't know how, hot glue is my best friend! I've seen so many tutorials for throw pillows using table covers from Dollar Tree. But, I didn't want to make a bunch of pillows and then have to figure out where to store them after the holidays. So I made 2 different pillow covers to match my Christmas decorations. Check it out!


Supplies:
  • Patterned throw blanket 
  • 2 white microfiber towels (Dollar Tree - in the auto section)
  • Hot glue
  • Scissors


Let's start with the microfiber towel cover. These will fit an 18x18 size pillow.

Step 1: Line up the 2 towels with the "right side" facing in. Use the hot glue to glue along the very edge of the towel. Glue the edges along 3 sides of the towels. 


* These towels are rectangular. You will need to glue the two long sides and one short side, leaving the other short end open. *

Step 2: Flip the towels inside out to reveal a seam, and insert the pillow.


Step 3: Tuck the leftover flap in over the pillow. 


* Optional Step 4: Add a ribbon around the pillow, secured with hot glue, for a decorative touch. This will help keep the open ended flap in place.


With the throw blanket I was able to make 2 pillow covers.

Step 1: Lay the blanket on a flat surface and place the pillow on top. Fold the blanket over the long way and cut along the length of the blanket. 


The right side is where I cut the blanket

Step 2: With the "wrong" side face up, fold over the narrow end of the blanket and glue it down. Then flip the blanket over. 


Step 3: With the "right" side face up, fold the blanket onto itself leaving a long flap at one end. This will create a pocket where the pillow will sit.


* To measure for the flap, place the pillow in the blanket before gluing edges. The pillow should fit in the blanket with the flap overlapping it about half way. *

Step 4: Glue along the edge on each side of the blanket. Then flip the blanket inside out.


Step 5: Place the pillow inside and tuck the flap in


You would never know these are made from a throw blanket and microfiber cloths!


Now, after Christmas I can simply remove the covers and store in a closet without taking up too much space! 


How to make a mini quote sign

Are you still with me? It's day 8 of #12daysofchristmascrafts! Check out this incredibly easy and simple mini quote sign. This could be a fun project to get the kids involved in!


Supplies:

  • small wood sign (Dollar Tree)
  • alphabet stickers (Walmart) 
  • paint (I used chalk paint)
  • diamond wrap
  • modpodge (not pictured)


Step 1: Paint over the image on the front of the wood sign. I painted about 4 coats. If you use a primer, it will take less paint to cover. 


- Painting only the front is necessary because the diamond wrap will cover the sides.

Step 2: When paint is completely dry, use alphabet stickers to write desired quote.


Step 3: Apply modpodge to entire painted surface to seal and ensure the letters stay on. These stickers don't have much adhesive on them.


Step 4: Attach diamond wrap around 3 sides of the sign using hot glue (or any craft glue). The bottom needs to be flat in order for the sign to stand.


I would never have used the sign the way I bought it, but this is adorable! Don't forget to tag me on Instagram @simplymindy3 with your Christmas crafts!


How to make napkin art on canvas

Day 7 of #12daysofchristmascrafts is a craft inspired by yet another You tuber The Magnolia Housewife. She made Fall Napkin pictures using wood. I had never seen this technique before and wanted to try it. So I did! But I used canvas instead of wood. 


Supplies:

  • Canvas (or wood)
  • Napkins large enough to cover the surface
  • Plastic wrap
  • Parchment paper
  • Iron


Step 1: Cut napkin slightly larger than canvas, and separate paper so your left with 1 ply.


Step 2: Lay plastic wrap on canvas, napkin over plastic, and parchment paper over napkin.


Step 3: Iron on high heat setting (with empty iron) for a few minutes. Pay particular attention to the edges of the canvas.


 - You can lift the iron periodically to check for sealed edge. Continue ironing if not fully adhered.

*Tip* Use an old iron if you have one, or be sure the parchment is covering any exposed plastic wrap.

Step 4: Cut off excess napkin/plastic around edges, and file down any jagged edges.


*Step 5 and 6 are optional.

Step 5: Add ribbon around border of canvas. I did this because the print on this particular napkin was smaller than the canvas itself.


- I cut a strip of this glittered ribbon in half lengthwise.

Step 6: Attach a frame easel hinge (the piece that holds a tabletop frame upright) using hot glue. 


 - I had these from some small frames I used to make a lantern. I wanted to be able to stand them up on top of my fridge.


Aren't these cute? Come back tomorrow for day 8!