easy

Diy Hot drink Station

With the colder weather fast approaching, I thought I would set up a hot drink station. Of course I had to get a little creative with placement since I don't have a lot of counter space. But, since I painted the countertop, I had switched the placement of my toaster oven and coffee maker, which made better use of the space. 

Since the coffee maker is now in a corner where the counter is rarely used, there is an area where a small shelf will fit perfectly. And where do you find a small enough shelf? Dollar tree of course. I used one of the small cabinet risers to create a cute little shelf.


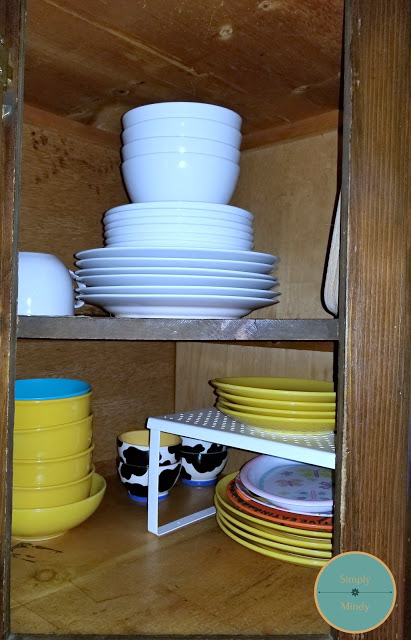
To make a shelf out of the cabinet riser I used foam board and contact paper, also from Dollar Tree.

First I measured the riser and cut a piece of the foam board to fit on top


I also cut out a second piece to fit the under side of the riser

 - I used hot glue to secure the foam board on the riser so it wouldn't move while applying the contact paper


I then measured and cut out two pieces of the contact paper to cover the foam board and any visible pieces of the top part of the shelf riser.


*If you've never worked with contact paper check out my dresser update .


Lastly I repurposed a paper towel holder to use as a mug tree.


To complete the drink station, I added a coffee can (from which I removed the label), a small container with stirrers, and a glass jar underneath for hot cocoa.


I'm on the hunt for a hot cocoa recipe that doesn't call for a load of sugar. Any recommendations? 


Cheap and easy dish cabinet organization

For the longest time, I had been procrastinating about rearranging this cabinet. The corner is soo deep, things can easily get lost in there if you don't pay attention. But, with some rearranging and the addition of a couple of shelf risers, I can now see to the back of the cabinet.

I think the before and after pictures will speak for themselves.

I simply swapped the location of the cups and plates. 
Before


After


And added a dollar store shelf riser to expand the capacity of the narrower cabinet.


With the plates in the other side ...
Before


I added a larger shelf riser (5.99) to break up the plates/bowls, and make it easier to grab one when needed.
After


Of course, in the process there were some items that went into the trash. But there were also a few items added to our donation bin, which will hopefully go on to a new home where they can be put to use.


If you like the simple functionality of this update, check out these Pins for some more budget friendly kitchen organizing ideas!

Savor and Savvy's 14 Frugal Kitchen Organizing Ideas features ideas for organizing everything, from the utensil drawer to bakeware pans.


Discover ways to add storage with clever and budget friendly tips from Dreaming in Diy's Easy and Budget friendly ways to organize your Kitchen.

How to turn Cylinder Vases into Decor


Today I'm sharing a super simple décor diy using cylinder vases, some vase filler, and embellishments. I wanted to add another decorative touch to my dresser since updating it with the contact paper.  And since my husband has decided he wants gold bedding, this project will be the perfect addition. By the way, if you know where I can get gold bedding (at a reasonable cost) let me know. Lol. Plus, all the supplies used (except for glue) are from the dollar store.


Supply list:

  • 2 cylinder vases (one 7.5 in. and one 9.5 in. in height)
  • 2 gold tea light candle holders
  • Embellishments 
  • Vase filler
  • Glue


Step 1:

glued each tea light holder to the base of each vase


-I used hot glue, but for a more permanent hold I would suggest  a stronger adhesive. I wanted the option of changing the look of these.

Step 2:

added embellishments


-I used gold toned floral wire around one vase, gluing at the top and bottom of the vase. On the other I layered a lace head wrap over white lace ribbon, using hot glue to secure. The white lace ribbon is not from the dollar store, but is optional.

Step 3:

added vase filler


-In the taller vase decorative rattan balls (leftover from my beach themed chandelier diy), and the shorter vase is filled with vanilla scented potpourri.

So, that's it!


I hope you enjoyed this project! This is so simple and easily customizable for any décor. It's also versatile. I could see this on a living room mantle, as a dining table centerpiece, maybe even in the bathroom. Oh the possibilities!

Thanks again, and God bless!

Living simply,
Mindy✿

How to make a Mini Vase

I love flowers! But, I don't like to buy fresh flowers because they eventually shrivel up and die. I believe that fresh flowers are meant to be outdoors where they can flourish and thrive. Just sayin'. I say all that to say, I did this project because I wanted to display a vase with flowers in my kitchen window (above the sink). 

The problem with trying to put a vase above the sink was the fact that there is no ledge to sit anything on. Pinterest to the rescue! I came across a mini vase that someone made out of salt and pepper shakers. The pin had individual shakers as one vase, but I took it a step further.

Take a look...


Here are the some of the supplies. I also used glue and twine.

-The only purchase was one set of the shakers. I had one from a previous project.

Step:1

Painted each shaker. I applied two coats of paint.

-To make this project quicker leave the shakers clear

Step 2:

Glued the shakers horizontally using epoxy glue

- This glue sets in about 30 minutes. You could also use hot glue.

Step 3:

Wrapped twine around the opening to make it look like one piece.

-I secured the twine with hot glue.


Step 4:

Added flowers.


Isn't it the cutest thing? I just love that it matches my décor now, but I can just change out the flowers seasonally or whenever I feel like it. And the best part? I only spent $1 because I had all the other supplies on hand!

As always, thanks and God bless!

Living Simply
Mindy ✿